Tutorial - Creating an MS Access Contact Management Database
This article will guide you through the key steps to making your own fully functional Contact Management software for free. Contact management (also called Customer Relationship Management, CRM or Prospect Management) can aid any business that interacts with 'contacts' (customers, clients etc.) on a regular basis. We also provide a free contact management download of a finished example database produced by following these steps that is ready to be edited and expanded upon to meet your specific needs. Download it using the link below and start using it right away.
FREE SIMPLE ACCESS CONTACT MANAGEMENT DATABASE DOWNLOAD
- Contains standard CRM system features like an Address Book and Contact History logging
- Includes professionally created Tables, Fields and Relationships
- Ready to use for simple purposes, or expand to meet your needs
- Compatible with all versions of Microsoft Access
Step-by-step Walkthrough
A good contact management database will hold information on all the people your business needs to know about and log all the interactions you have had with them. A great contact management database goes one step further and tells you if and when a follow up action arising from an exchange should take place (e.g. to create a document and send it to the contact).
We will be showing you how to use Microsoft Access to create such a system with ease, plus revealing plenty of tips and tricks from years of experience that will make your life easier and your database smarter. In this article, we focus on Access 2010, but the processes are nearly identical in the 2007 and 2013 versions.
Before we begin you’ll obviously need a copy of Microsoft Access on your computer. Access is a powerful database creation and management tool that is used throughout the world. It is a great program to use if you are new to databases as it is easy to learn and most of the things you’ll want to be doing are built into it already.
We shall be assuming a very basic familiarity with how MS Access works, but you don’t need to have ever made a database to follow this guide.
Designing Your Contact Management Database
The first step to creating your database is to plan out all the Tables you’ll want and the Fields each one should contain. To be as flexible as possible, you might want to do this on paper. Each table should hold information on a single topic. For example, the first table we want should store the information on the contacts in our database. We’ll call this table ‘Contacts’.
The fields we choose for this table depend on what we want to know about our contacts. For example, let’s say we want to store their name, address, and a company they are associated with, if any. The details of the company are separate from the details of the contact, so we’ll make a second table called ‘Companies’. Later we’ll make a Relationship between our company field in the contact record and our company table that will allow Access to see details from the company table whilst looking at the contacts table.
There are in fact many pieces of information about a contact that we could store in other tables and link back to our contact via relationships. This is either because they are part of a larger set of other information (as with company) or because we want to limit the possible choices the user can make to a strict list which the other table can store.
In our example, we have made several tables that altogether completely define our contact.
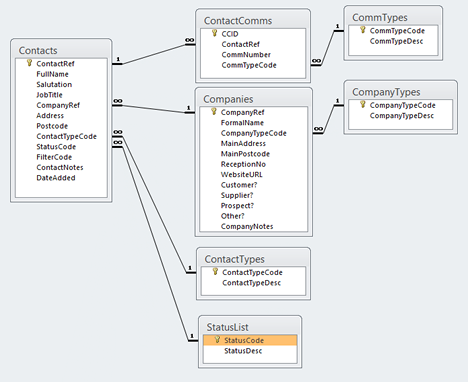
Each black line represents a relationship between the tables. The ‘one’ and ‘infinity’ symbols at either end of the line tell us that these are one-to-many relationships, meaning there can be many of one piece of data attached to just one of the other (e.g. one company could relate to many of your contacts). In your design, you should think about what relationship types you are using and add the appropriate symbols. When you build the database in Access later, this will be done automatically (see below).
Many of the relationships here are set up to enable the user to select from predefined entries in lists. Take the relationship between StatusList and Contacts for example. For every possible status (StatusDesc) there is a code to identify it (StatusCode). We might assign a StatusCode ‘A’ to a StatusDesc ‘Potential Client’. Then, when entering the information on our contact to our database, when we come to the StatusCode field we can select from a list of the status descriptions (the thing we humans understand) and Access will store associated code (the thing the program understands).
You can see other relationships of this kind too: Contact Types, CommTypes and Company Types. Feel free to copy these examples, but in your database you will want to have the tables that suit you, so think about the sorts of information you store for your contacts, and whether it will be useful to have choices hard written into your database.
The relationship from Contacts to ContactComms is a little different. Here we have decided to store all the various phone numbers and email addresses that might be connected to a contact in a separate table so as not to clog up the original table and to account for there being no set amount of numbers one contact can have. Then if we wanted to see the numbers for a contact, we would just search our ContactComms table for the contact in question, via their ‘ContactRef’. This stands for ‘Contact Reference’, a unique identifier of each contact.
In fact, you will need something to uniquely identify each record in every table. Traditionally this is the first field, and is referred to as the Primary Key. Note the key symbols in our design above marking which fields are the primary key for each table. You can make the Primary Key anything you want, as long as it will never be replicated in any entry (e.g. don’t make Postcode the Primary Key for your contacts, as you might have two contacts in the same building). We recommend that you make it something short and logical, like a number (what we call ‘ID’), letter (what we call ‘code’), or a sequence of characters (what we call a ‘Reference’).
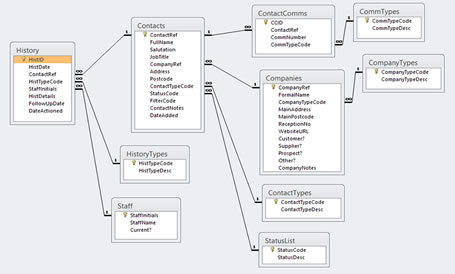
So using these examples try and set out on paper all the tables and fields you’ll want in your database and all the relationships you want to make between them. Remember you’ll want a table to hold information on all your interactions with your contacts, which will form a substantial part of your database. In our example we call this table History.
When you are done, your plan might look something like this.
(Click picture to open full-size version in a new tab.)
Reviewing Your Database Design
Your design represents your database structure. You might look at it and realise that actually you need a new table, or a different relationship from what you have drawn. This is why designing first is important, because it is much more time consuming and difficult to change a database structure once it has been established than to make it exactly how you want it in the first place.
Some things to think about at this stage are:
- In tables where the user will be manually inputting data, are the fields in a logical order? E.g. it seems more natural to insert a contact’s name before their address.
- Are any of your field titles more than one word? If so we recommend you write them without the space, as this will make your database easier to manipulate with Visual Basic code if you ever want to insert some more advanced features.
- Are there any fields in your database that have the same name, but aren’t the same information? E.g. you might have placed a field called ‘Address’ in both Contacts and Companies. Since they are not going to be the same thing, it is important in Access that they have distinct names.
If you want to give your contact management database the ability to warn you when it’s time to carry out an action agreed with a contact, you’ll want to include a field like ‘FollowUpDate’ in the ‘History’ table, as well as a field that tells you whether the action has been completed yet or not, like ‘DateActioned’ in our example. (You might just have a Yes/No tick box, called ‘Actioned?’, but this will give you no information on how quickly you are following up on your tasks, so it may be more useful for your own analysis to use an action date.)
Once you are happy with your design it is time to make it a reality!
Setting Up Tables and Fields
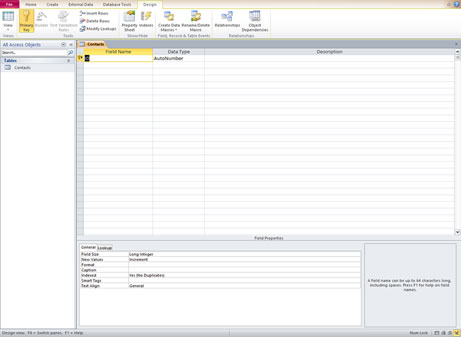
When you’re ready, open up Microsoft Access and start a new, blank database. You will be presented with your first empty table in ‘Datasheet View’, the mode of operation used to input data. But first we need to set up all the fields in our table, so we need to head into ‘Design View’, which can be achieved by clicking on the ‘View’ button near the top left hand corner. You’ll be asked to give your table a name; let’s assume you want to make your main contacts table first, so as set out in your earlier design you could call it ‘Contacts’.
(Click picture to open full-size version in a new tab.)
When you enter design view you’ll see three columns. The first of them is ‘Field Name’. All you need to do here is go through adding the field names you have already chosen in your design to each row. Make sure the intended Primary key has the key symbol next to it. To change the Primary Key, select the Field Name you want it to be then click on the ‘Primary Key’ button in the Ribbon at the top.
Once you have all your fields, you need to select a Data Type for each one. Choose something that is relevant to the type of information you want each field to be storing. For a date, you might select ‘Short Date’. For a name you will probably want ‘Text’.
When you select a Data Type, you’ll see there is a variety of options in the Field Properties window near the bottom of the screen. Here you can be more specific about what sort of records will be in your fields. For example, you only need 8 characters to store a postcode, so you could set your Postcode field to Text and set the field size to 8. This will mean the user can’t put in more than 8 characters, preventing them from making a mistake.
For more information on the other properties and how they affect your data, press F1 while the cursor is in the property entry window for each one. You can also look at the properties we have used in our sample database download to get an idea of where each one might be applied.
Go through all the fields in your table and make sure they have the properties you think they will need. It will be possible to change them later, but for fields that will be involved in relationships, this can be difficult. It is a good idea to add captions to any field names that aren’t completely clear, or could do with spaces between words to improve readability. Whatever you write in the Caption box will appear instead of the field name when viewing the table in the future.
Now, although not required, you might want to add a description to each field. This is helpful because whatever you write will appear in the Status bar at the bottom left-hand corner of the screen when a user selects the field ready to make an entry.
Your finished Contacts table in Design View should look something like this.
(Click picture to open full-size version in a new tab.)
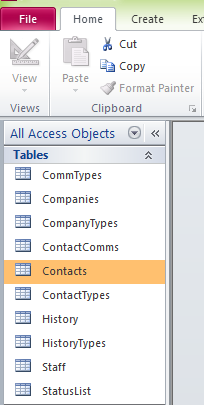
Now you are ready to make the rest of your contact management tables. Click on ‘Create’ at the top left of the screen, then ‘Table Design’ to open up a new design view window, ready to make your next table. Use the paper design you made earlier to fill out all the tables you want with the correct fields. You’ll see all of the tables you’ve made displayed in the Access Objects navigation pane on the left side of the screen (press F11 if you can’t see it and it will appear).
Take note of the fields that you have decided are related. The fields at each end of the relationship must have the same properties for the relationship to work. So a text field with field size 10 can’t relate to one of field size 1. If you forget to make the properties the same, Access will force them to be the same when you make the relationship, which could lead to loss of data if you have already started putting actual records in your table, so it is best to get it right from the start.
Establishing Relationships
With all tables and fields complete, it is time to establish the relationships planned out earlier. For example, let us say we want to connect the company field in Contacts to something that uniquely identifies each company which is the CompanyRef field in Companies.
First head back to the Contacts table in design view. Now highlight the Data Type of the company field. In the drop-down menu you can see ‘Lookup Wizard’. You should proceed to select this; don’t worry, the Data Type you had selected previously will still apply to that field; the Lookup Wizard is just launched from this menu, rather than being an actual part of it.
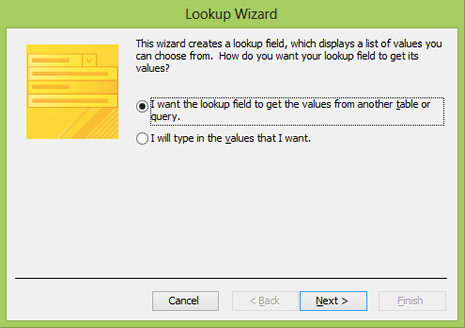
You will want to pick the first of the two options the Wizard will offer you. The second will allow you to input a list of possible companies that you can’t edit, which isn’t very useful in this case.
Click ‘Next’ to proceed. Now select the Companies table as where you want to look up the information from. Click ‘Next’ again.
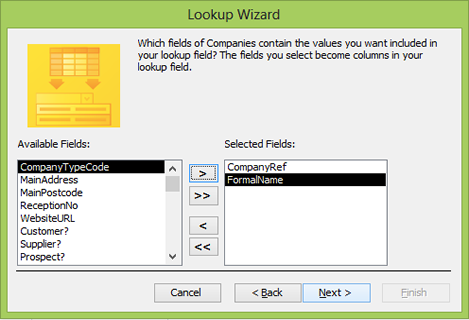
It will now ask you which fields you want to get information from. All you really need is the unique identifier of the company, the CompanyRef. But in case that reference doesn’t mean anything to your user, you might want the actual name of the company to appear alongside each reference when making your choice. To achieve this we will want information from a field containing this name.
So choose your key and the company name, which in our example means the two fields CompanyRef and FormalName. Then click ‘Next’ once again.
The next page gives you the option to sort the entries in a particular order when your user comes to select what company their contact works for. For example, you might pick ‘FormalName’ and ‘Ascending’ to have them appear in alphabetical order.
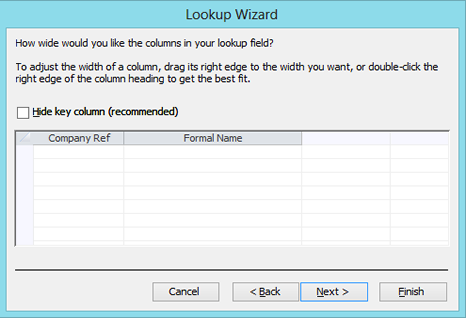
On clicking ‘Next’ to proceed, you come to a window that will allow you to change the column width of the fields on the menu. You’ll notice that the Primary Key is not appearing on the menu as the ‘hide key column’ box it ticked. In this case the Primary Key is the field that will actually be appearing in our table, so it makes sense to be able to see it; go ahead and uncheck the box for now.
Pick a width for your field that you think will be appropriate (if unsure, exit the wizard and put some trial data into the field to which you are linking; it will then appear in this wizard window when you return to give you an idea of scale). Again click ‘Next’.
Next the Wizard will ask you which field you actually want to bring into the Contacts table. In this case we want CompanyRef, so select it from the list and click ‘Next’.
Now you are on the final window with a variety of options. The label for your lookup field is just the field name that will appear in the Contacts table. You probably want to leave this as it is. You should also usually choose ‘Enable Data Integrity’, as this means if a piece of data gets changed in one table, it automatically updates the other table it appears in.
You are given two kinds of delete options: ‘Cascade’ and ‘Restrict’. In general it is safer to select the second one, which simply means deleting something on one side of the relationship has no effect on the other side. Cascade delete means if you delete a record, everything to which it is related will get deleted as well. So in this case, if we deleted a company, all the information on the contacts that worked for them would be deleted too. We may not want this, so pick ‘Restrict delete’ for now.
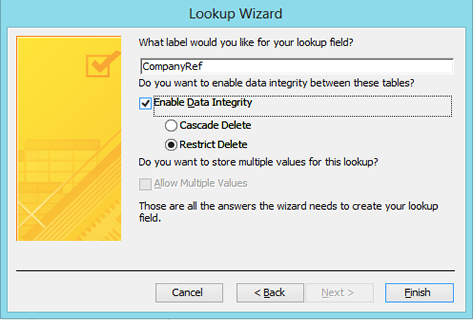
Finally you can click ‘Finish’, and the relationship is fully established! You can now repeat this process for all the relationships you wish to set up, using your paper design for guidance. Take note of the ‘Lookup’ tab in the properties window, for it contains additional options you can configure for your new relationship. Again use F1 when selecting an option to get information on what it does.
Once at least one relationship exists, you can see the connection by selecting ‘Database Tools’ at the top of the screen, then ‘Relationships’. At the top, click on ‘Show Table’ and pick Contacts, then click on the ‘Direct Relationships’ button. You should see something that looks like the picture below.
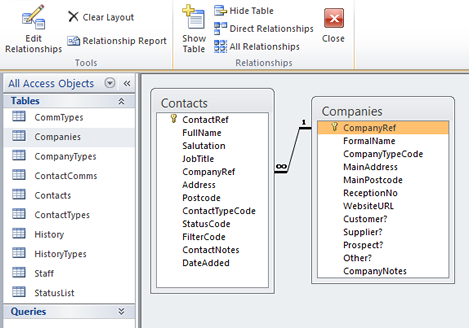
You can expand the window and move the tables around in the diagram to get a layout that seems logical, which is especially important when you have many tables and relationships to consider.
Set up all your relationships then return to the Relationships window and click on ‘All Relationships’ to see your database in full and compare it to your initial design.
Your database is now ready to receive data! So far your database simply stores information and allows you to come and look at it for reference. But the true power of a database comes from the clever data mining it can do to collate information from across multiple tables to extract the details that you need to know. If you wish to expand your database to do such a thing, then read on…
Next Page >Contact management is just the beginning for most databases; we at Software-Matters can produce databases that apply to any and all aspects of your business and link all your operations together into one system. If you need a professionally made bespoke database of any kind then contact us to discuss your needs and decide whether you would like our database experts to craft a system designed to meet your business’s needs, no matter the size.
If you enjoyed this article or found it useful, why not tell others about it?![]()
Software-Matters is an all-UK software development team based in Gillingham, Dorset, and close to Wiltshire, Somerset and Hampshire. Nearby cities include Southampton, Bristol, Bath, Bournemouth, Poole and Salisbury.


